
If you’ve spent any time as an Android developer you’ve probably experienced some level of frustration with Gradle in Android builds.
I’m no exception to this rule. I’ve often enjoyed a laugh at Gradle’s expense, or laughed and nodded along as coworkers shared their own harrowing stories of lengthy or broken builds.
However, I also think much of this frustration and complaint is unwarranted, or at the very least, misplaced. The Android build toolchain has a number of unique components and I often find others, and myself, blaming Gradle for something that might not actually be Gradle’s fault at all.
So this week, I want to pull back the curtain, and share a bit about Gradle and how it relates to our Android builds.
How Does Gradle Relate To Your Android Project?
Let’s start at beginning.
What is Gradle?
Gradle is a build tool capable of building software projects across a variety of different languages and domains.
Gradle projects are configured using a Groovy-based DSL (Domain Specific Language). Groovy, itself, is a multi-purpose programming language for the Java Virtual Machine (JVM).
How then do these both work together to build our Android apps?
What Are The Individual Components Of An Android Build?
To build our Android apps using Gradle, we rely on another important component; the Android Gradle Plugin.
The Android Gradle Plugin builds upon the generic concept of Gradle plugins to support the Android build requirements. Custom Gradle tasks, and build configuration options are provided by the Android Gradle Plugin to control how an Android application is built.
Android Gradle Plugin (AGP) is not directly tied to Android Studio, though they do often have a close connection. As new features are added to the plugin, Android Studio is generally updated to take advantage of those features to provide a better developer experience.
How Is Your Android Gradle Project Structured?
A Gradle project is comprised of one, or many, modules. A module may consist of any combination of source code, resources, assets, and build configuration.
Your Android project configuration is comprised of several different files:
- a top-level settings.gradle file to indicates which individual Gradle modules should be loaded
- a top-level build.gradle file that can be used to declare project-level dependencies, plugins, and other configuration
- one, or many, module-level build.gradle files that define how each individual module and built and how they relate to one another
If you create a new project in Android Studio, you generally have a single `:app` module created.
How do these build components work to build your app?
How do all of these pieces work together to actually build your Android app?
Your project, and each module, use the Groovy language and Gradle DSL to control how they should be built.
Any of these projects that need to know about the Android framework will use the Android Gradle Plugin to configure Android-specific build options such as minSdk, buildTypes, lintOptions, etc.
This is easily recognized by applying the plugin to a `build.gradle` file
plugins {
  id 'com.android.application'
}
and by modifying the Android configuration block
android {
  compileSdkVersion 30
  buildToolsVersion "30.0.1"
  ...
}
All of these `build.gradle` files will work together to define which tasks should be generated and run. Each Gradle task is responsible for one small piece of the project compilation and packaging process.
To see a list of all Gradle tasks available for your Project, you have two options:
- Run ./gradlew tasks from the command line
- Open the Gradle tool window within Android Studio or IntelliJ
Once all tasks are defined and configured, the general Gradle build tool will process the build files, generate any needed tasks, and ultimately execute each task.
Most Gradle plugins use enhanced tasks which means they contain all the behavior needed to perform their desired action. Enhanced tasks also are responsible for declaring needed inputs and outputs.
You can think of a Gradle task as a function that takes in a set of inputs, and generates a specific output. The work executed could be processing a file, merging resources, uploading an .apk to Firebase, or any number of other actions.
Once these tasks finish executing, the Gradle build is complete.
What Are The Pain Points Of Gradle In Android Builds?
I hear, and have experienced, several common complaints about different parts of this build process.
Defining build logic
Many people feel it’s too difficult to define, or customize, build logic. Gradle often gets blamed for this, when in reality, it’s like Groovy that developers are unfamiliar with.
Because Groovy can be both dynamically, and statically, typed, it can feel very foreign if you’re not expecting dynamic typing. How do I define a variable to determine whether we’re building on CI or not? How to I loop over a collection of build variants? Lack of robust auto-completion can leave developers feeling lost when trying to define custom build logic.
To help with this, you may benefit from learning more about Groovy as a language. The language syntax guide may be a good starting point for you.
Additionally, improvements to Gradle and Android Studio have made it possible to define your Gradle build logic using statically typed Kotlin, rather than Groovy. If you miss static typing and Kotlin language features when defining your build logic, read more about how to start using the Gradle Kotlin DSL.
Exploring the Android Gradle Plugin
Another big Gradle-related frustration for Android devs is that they don’t know what configuration options are available. What flags are available to control how a project is built? How do you work with Android-specific facets of the build during the Gradle build process.
To help answer these questions, it be be useful to read through api reference docs for the Android Gradle Plugin. This gives detailed documentation on what configuration blocks, and types can be used to control your build.
For example, if you were looking for more information on how to control Android Lint tasks, you could reference the `lintOptions { }` configuration block.
Other configuration blocks include
Working with annotation processors
One of the most common, and serious, build issues Android developers may face is that of slow builds.
There are lots of reasons your build may be slow; and we’ll look at some tools for detecting and fixing these issues. One of the most common culprits of a slow build are annotation processors. Tools like Dagger or Android DataBinding rely on annotation processors to generate code at compile time. This saves code and the cost of slower builds. This issue is particularly bad when using annotation processors in Kotlin projects.
To help with this, take a look at the Annotation Processing with Kotlin guide. In it, you’ll find several tips for ensuring your build is better optimized for annotation processing.
Profiling Gradle In Android Builds
As you start to further understand your Gradle build, you’ll likely want to profile it to really dig in and see which parts of your build are taking the most time.
The go-to tool for this are Gradle build scans. A build scan provides deep insights into your gradle build including, which tasks were executed, which tasks were pulled from local and remote caches, and which tasks are taking the most time.
To generate a build scan for any Gradle build, you can add the –scan build flag after the invocation.
Once the task finishes, you’re receive a link to a report like the following.
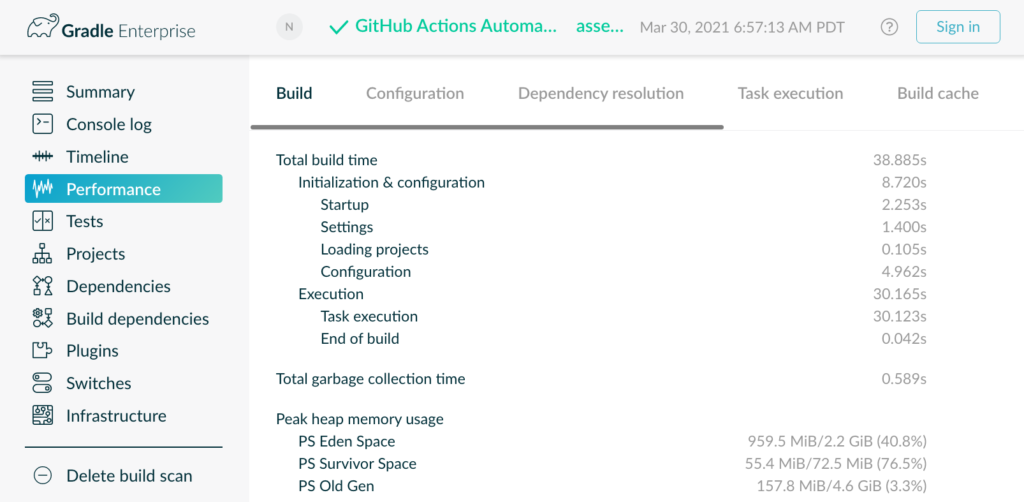
Open the report into a web browser, and you’ll be able to explore every facet of your build, and can use this information to start optimizing your build.
If your team is using Gradle Enterprise, you’re likely already familiar with using Gradle build scans. To get the most out of these scans, it’s helpful to make them easily discoverable for everyone on your team. I recently shared about how we surfaced Gradle build scans within our GitHub Actions workflows.
For more on Gradle build scans, you can follow this guide.
Benchmarking Gradle In Android Builds
As you start profiling your build, you may identify avenues of possible improvement. When making changes to your build. it can be useful to benchmark current, and updated, build performance to know whether your changes are actually impacting your build.
To do this, you can turn to the gradle-profiler tool.
Gradle-profiler helps you automate the repeated testing, and data collection, needed to really understand build performance.
Imagine running 10 Gradle builds in a row, collecting the build times, and performing statistical analysis on those build times. That’s effectively what gradle-profiler provides.
With gradle-profiler you can benchmark a single simple task, a complex build scenario, or even a suite of build scenarios.
These benchmarks can also be run against different branches of your app. This can allow you to compare the benchmark performance of any given branch to that of your default branch; ideally detecting build regressions before they’re ever checked in.
For a great overview of using gradle-profiler check this post from Tony Robalik.
Optimizing Your Gradle Build
Finally, once you’ve profiled your build, and once you know how to benchmark the impact of any build changes, you’re going to want to start optimizing performance to have the fastest, most efficient build possible. This can save your team both time and money.
Enabling performance settings
There are several build properties that can be set to help provide quick build performance wins:
- org.gradle.parallel=true
- org.gradle.vfs.watch=true
- org.gradle.caching=true
By setting the parallel flag, you enable your project to build multiple tasks at the same time, as long as they are in different modules. If you have a multi-module setup, this can be a great performance win.
The vfs.watch flag enables the new filesystem watching feature of Gradle which monitors information about which files are changing to improve incremental build times.
Gradle build cache
The caching flag is one of the biggest performance changes you can make. Gradle has two different build cache types: local and remote.
Setting the caching flag will enable the local build cache.
With caching enabled, the outputs of Gradle tasks are saved to the cache and reused for future builds. This can dramatically speed up clean and incremental builds.
Similarly, you can enable a remove build cache that moves this concept to a remote server. You might configure your CI server to push task outputs to the remote cache which can then be reused by everyone on your team, and by future CI builds.
Browse the Gradle Build Cache guide for more information on enabling caching for you project. Additionally, there’s a great webinar from Gradle on how to get the most out of the Gradle build cache. I highly recommend watching that to learn more on profiling and optimizing your Gradle build.
JVM memory settings
You may also want to update your JVM memory settings to provide Gradle/JVM more memory when building your app.
- org.gradle.jvmargs=Xmx2g
Build performance plugins
There are also two really useful plugins I can recommend for helping you fix and monitor Gradle build issues.
First, the Gradle-Doctor plugin helps you diagnose common issues such as mismatched JDK versions and negative remote build cache savings. If building an Android app, gradle-doctor can also help you understand how much time is spent by Dagger annotation processing.
Second is the Android Cache Fix Gradle Plugin. This is a must-try plugin for Android projects.
It provides workarounds for Gradle build issues present in the Android Gradle Plugin. Most noticeably, it helps fix cache misses due to these issues with AGP. In a well configured Gradle build, fixing cache misses can have a massive positive impact on your build times.
Integrate this plugin, re-run your benchmark scenarios, and you’ll hopefully see nice positive improvements to your build times.
Wrapping Up
Android builds are complex, with multiple languages, tools, and plugins to consider. As we spend so much of our time waiting for code to compile, or CI builds to run, it’s in the best interest of ourselves, our teams, and our organizations if our builds are fast and efficient.
I think the best way to start improving the efficiency of our builds is to better understand our build tools and the overall build process.
Hopefully, this has helped you better understand some of these individual build components, and helped point you to resources to help you further your understanding of the Android build process.